Some people consider a glider as the obvious choice for the first model.
Although a glider normally flies slower and is supposed to be more forgiving,
I think that's just a matter of taste.
Being a skilled glider pilot doesn't necessarily mean being also a skilled
powered aircraft pilot and vice-versa.
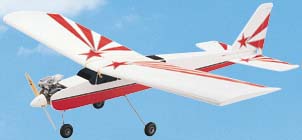
Assuming that a powered model was chosen, the beginner is advised to start
with a so-called trainer.
This type is usually a high wing aircraft model with nearly flat bottom airfoil
that produces high lift, permitting slow landing speeds without stalling.
It also has some dihedral angle to give a good lateral stability.
However, a flat bottom high wing with
dihedral is more sensitive to crosswind
gusts, so the first flights should be
done during calm weather.
A beginner should avoid wings with
too sharp leading edges, as it will
worsen the stall characteristics.
A well-rounded leading edge is therefore preferable, as it better conveys the
airflow onto the upper wing surface allowing higher angle of attack at low speed.
A trainer model should not be too small, as it would be difficult to assemble and
maintain and would be more sensitive to strong winds.
  It should not be too large either,
  as it would be difficult to transport,
  require a larger flying field and
  would be more expensive.
A reasonable size is about 150cm wingspan (60 in) with a high aspect ratio,
which means the wingspan being about 5.5 times the wing chord.
A square wing is advisable, as it distributes the weight of the aircraft evenly
over the entire surface of the wing.
In order to allow a reasonable low landing speed without stalling, the wing
loading should not be greater than about 60g/sq.dm (19-oz/sq. ft).
Wing loading is the aircraft's weight divided by the wing area.
Some degree of wing washout also improves the stall characteristics.
The basic parts of a trainer model:
Engine - provides the power to rotate the propeller. Propeller - (also Prop) is attached to the engine's shaft to convert rotational motion into thrust
and speed, which depends on the Prop's diameter, pitch and the Engine's power. Spinner - streamlined part that covers the end of the Prop shaft. Fin - (also Vertical Stabilizer) provides directional stability (stability in yaw). Rudder - moveable part fitted to the Fin's trailing edge, is used to change the aircraft's direction. Stabilizer - (also Horizontal Stabilizer or Stab) provides longitudinal stability (stability in pitch). Elevator - moveable part fitted to the Horizontal Stabilizer's trailing edge, is used to make the
aircraft climb or dive. Ailerons - movable parts on both sides of the Wing's trailing edge, are used to make the aircraft
roll about its fore - aft (longitudinal) axis. When one aileron moves up the other moves down. Wing - provides the aircraft's main lifting force.
One may build a model aircraft based on drawings (plans). This requires some
building skills and also time and effort to find out and gather the materials needed
for the construction.
An easier approach (albeit more expensive) is buying a kit of parts.
There are many kits on the market with different levels of prefabrication depending
on their price.
The cheaper kits have most of parts included, but some pieces come either pre -
cut or printed on sheets of wood, so the builder is expected to do some extensive
job, such as to cut out the fuselage formers and wing ribs, glue the parts together,
apply the covering material, etc.
For those who are not so keen on construction, there are almost ready to fly (ARF)
kits with an extensive prefabrication, requiring one or two evenings to assemble.
There are also ready to fly (RTF), which normally come complete with the power
plant, battery, charger, and many of them even with the radio preinstalled.
And the plug and fly (PNF) or plug and play (PNP), which also come complete
with the ESC, motor, and servos all pre-installed, but often require your own
transmitter, receiver, battery and charger.
Further, there are bind and fly (BNF), which also come complete with the ESC,
motor, servos and receiver pre-installed, but need to bind with your own transmitter.
Check the plane's Balance Point (may also be referred as Center of Gravity CG
on some drawings) with empty fuel tank by supporting the model plane with your
fingertips underneath the wings. Find the position where the fuselage gets level
or its nose points slightly downwards. Then check if this position matches the one
shown on the plane's drawings or instructions.
Transmission range check should be performed on the ground before the flight.
This is usually done with the Transmitter aerial collapsed. The control surfaces
should respond without glitch at a distance of about 80 meters (263ft).
This distance is only an approximately guide line, as the actual range may vary
depending on the environment.
The effective range may only be half of this value if located at mountain bowl site
or close to a public radio transmitter, radar station or similar.
The range may suffer adverse effects if the receiver aerial is close to metal parts
or model components reinforced with carbon fibre.
Some transmitters allow the aerial to be totally collapsed inside a metal case,
which also may reduce the radiation.
In this case the lower section of the aerial should be extended during the test.
The check should be repeated with the power system running, alternating the
throttle setting between idle and full-throttle.
The range will be much higher when the plane is in the air, normally about 1Km
or as far as one can see the plane.
Take-off:
If you hand launch your plane, throw it against the wind horizontally and
straight ahead, not up.
If you take-off from the ground, taxi the plane towards the wind and let the
plane gain ground speed before applying elevator.
Once in the air try to climb at a very small angle, not abruptly upward, which
may cause loss of airspeed and stall.
The model is more sensitive to the motor torque effect during the relatively
low take-off speed and may begin to turn left (or right). Use the rudder or
ailerons to prevent the model from turning during the climb stage, otherwise
the model may initiate a spiral dive.
Don't try any turns until the model has gained speed and reached a "safe
altitude". Be very gentle with the controls and practice gentle turns high in the
air before you try to land.
To prevent losing altitude when turning the model, just give little up elevator
at same time you make a turn.
Try to keep the model in sight and do not fly too high or too far away.
You may reduce the throttle while high in the air so you may get an idea how
the model behaves at low speed.
To prevent getting confused about which way to turn when the model flies
towards you, turn your back to the model slightly while keeping watching it,
so you can imagine "right" and "left" from the model's point of view.
Some trimming may be needed in order to reduce or eliminate roll, bank and/or
pitch tendencies.
A flat bottom wing often tends to "balloon" up into the sky, keeping climbing
when full throttle is applied. This may be reduced during the flight by adjusting
the elevator trim or by reducing the throttle.
In worst cases it may be needed to increase the motor's down-thrust angle
and/or decrease the main wings incidence angle.
Landing:
Reduce throttle to about half so you have to slightly pull up the elevator to keep
the altitude.
Turn the model towards the wind and let the model sink gradually towards the
landing area by easing the elevator.
During the last fifteen to twenty meters (45 to 60 feet) of descent, (which
depends on the model's characteristics) you should idle the throttle.
The model will start sinking at a higher rate now. Try to keep the model in a
shallow dive and don't use the elevator to gain altitude or to prolong the
flight at this stage, otherwise stall is likely to occur.
Just keep a slightly downward attitude throughout the final approach in order
to maintain the airspeed.
The higher the wing loading, the steeper the approaching angle may be
however, it is not recommended approaching angles greater than 45 degrees.
If you notice that the model is sinking too fast or is too low to reach the landing
field - just increase the throttle first before applying elevator to maintain or gain
altitude to prolong the flight or to repeat the landing approach.
Pull up the elevator slightly about 30-60cm (1-2 ft) before the touch-down so
that the propeller or nose gear don't hit the ground.
Be prepared to repeat unsuccessful landings several times, since it's often a
matter of trial and error before one gets used to how the model behaves.
Don't try to land in a specific spot, avoid turns when the model is flying low
or at low speed. Just let your model glide into the ground straight-ahead.
Avoid the proximity of buildings, roads and electric power lines.
Don't fly close to or towards people and animals.
The bigger the field for your first flight, the greater will be your chances
of success.
- Good luck.
It's also advisable to join the nearest model aircraft club there you may meet
experienced flyers who can provide you with lots of useful tips and hints.